How to Setup Subversion + Apache + WebSVN on Windows
Last Updated: May 15, 2011
We develop websites and online applications for banks, credit unions, eCommerce sites and corporate credit unions using the MemberProtect security framework for ASP.NET. It's imperative that we have a reliable source code control system that allows a team of developers, often working from different physical locations, to work together on a single project. Subversion is an easy to learn and use version control system that suits our needs almost perfectly. Subversion runs equally well on Windows and Unix, and it also works over HTTP & HTTPS, which is great if your development team works offsite. But setting up HTTPS access and web-based repository viewing via WebSVN can be tricky on Windows, so I’ve documented the steps I use to setup Subversion 1.4 + Apache 2.2 + WebSVN 2.0 on Windows.
I used Windows 2000 Server in this tutorial, but I recommend Windows 2003 Server for a production setup. I also recommend practicing this tutorial on a virtual machine that allows you to take snapshots, such as VMWare. VMWare allows you to take snapshots of your system after steps 9, 20 and 25; the snapshots allow you to easily roll back to the last good working machine state should you encounter problems during any steps.
Step 1 – Download the correct Subversion package for Apache 2.2
NOTE: Some of the download links referenced in this guide are now dead. If you'd like to download all of the software packages I use in this guide, you can download a single ZIP file here.
I use the binary package rather than the self-installer, which I've included in the download package.Make sure you’re downloading the version compiled for Apache 2.2
Step 2 - Unzip the package you downloaded and place in c:\subversion (or any path that you prefer)
This is self-explanatory.
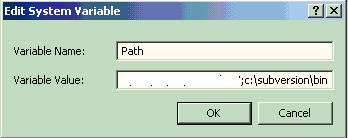
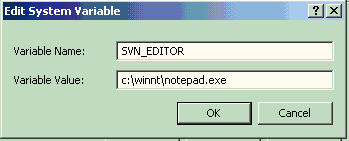
Step 3 - Set PATH and SVN_EDITOR system variables
To make your life a little easier, add the path to your Subversion bin folder to your system PATH variable. In this instance, you’ll add: c:\subversion\bin
Next, create a new variable called SVN_EDITOR and set it to c:\winnt\notepad.exe (or wherever your notepad.exe file resides)
Step 4- Create a path for your repositories
You should create your repositories on a large partition if you plan to maintain multiple large projects for a long period of time. For this guide, we’ll assume you’re creating a folder called SVNRepos on your C: drive. Your path to your Subversion repositories would then be C:\svnrepos
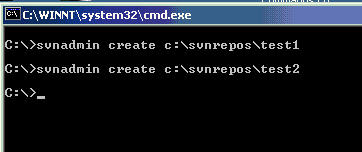
Step 5- Create a test repository
Now assuming that your path is configured properly and the update is active, you should be able to create your first test repository. Open a command prompt and type the following commands:
svnadmin create c:\svnrepos\test1

svnadmin create c:\svnrepos\test2
If the commands complete successfully, your folder structure should now look like this:
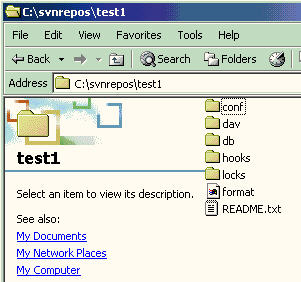
If your svnadmin command did not fire, then try rebooting your system to ensure that the new path has been loaded successfully.
Step 6 – Setup basic security for your repository
Open the c:\svnrepos\test1\conf\svnserve.conf file and make the following changes:
- Uncomment “anon-access = read” and change to “anon-access = none”
- Uncomment “auth-access = write”
- Uncomment “password-db = passwd”

Save your changes
Step 7 – Create usernames and passwords
Open the c:\svnrepos\test1\conf\passwd file with Notepad and uncomment the two username/password pair lines

Save your changes
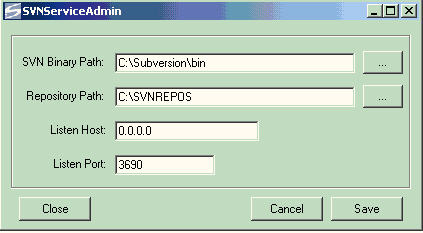
Step 8 – Download SVNService and install
Now we need to install the Subversion Service to run as a Windows service. An easy way to do this is to download the SVNService installer package from http://svnservice.tigris.org/files/documents/2717/36986/SVNServiceSetup-0.5.2.msi
After you’ve installed the package, open the SVNService Administration console (Start > Programs > SVNService) and set the following parameters:
SVN Binary Path = c:\subversion\bin

Repository Path = c:\subversion

Listen Host = 0.0.0.0 (yes, really set this to 0.0.0.0)

Listen Port = 3690
Step 9 – Reboot your server
While not 100% necessary, go ahead and reboot your server just to make sure that everything is in working order. After your server restarts, you should now have a new service in your Windows Services panel named “SVNService” and it should be started. If it is not started, make sure to start it and also to set it to start Automatically.
You could stop here and use TortoiseSVN or any other Subversion clients to access your new Subversion repository using the standard port and client access methods. But it’s nice to be able to access Subversion via HTTP and HTTPS, especially if you or your users may need to access the Subversion server through a firewall. So now let’s install Apache to open that option.
Step 10 – Download the appropriate Apache 2.2 package
Use Apache 2.2.4 with OpenSSL 0.9.8d I've included it in the download package.
Step 11- Install Apache
I like short, clean paths for tutorials like this, so rather than using the default install path, I recommend changing it to c:\apache2. You may choose whichever path you’d like, just remember to adjust the instructions accordingly as you proceed through the tutorial.
Step 12 – Copy modules and DLLs for Subversion to Apache
Copy
c:\subversion\bin\mod_dav_svn.so
and
c:\subversion\bin\mod_authz_svn.so
to c:\apach2\modules
Copy
c:\subversion\bin\libdb44.dll
and
c:\subversion\bin\intl3_svn.dll
to c:\apache2\bin
Step 13 – Modify httpd.conf to load the SVN modules
Add the following two lines to your c:\apache2\conf\httpd.conf file in the DSO section (just look for all of the lines that start with LoadModule):
LoadModule dav_svn_module modules/mod_dav_svn.so

LoadModule authz_svn_module modules/mod_authz_svn.so
Now remove the comment in front of this line in httpd.conf:
LoadModule dav_module modules/mod_dav.so
Step 14 – Add /svn location info to httpd.conf
At the very bottom of your httpd.conf file after the tag, add these lines:
<Location /svn/>

DAV svn

SVNParentPath c:/svnrepos

AuthType Basic

AuthName "Subversion Repository"

AuthUserFile conf/svn-password.pass

#AuthzSVNAccessFile conf/svn-authz.conf

Require valid-user

</Location>
Step 15 – Create an Apache password file
To allow Apache to handle authentication for you, you’ll need to create a password file. Open a command prompt, change to the c:\apache2\bin folder and type the following command:
htpasswd –cm c:\apache2\conf\svn-password.pass harry
The system will prompt you to then enter and confirm a password for harry. For the purpose of this tutorial, set Harry’s password to: harryssecret
Step 16 – Start the Apache Service
Open the Windows Services control and start the Apache Service. If everything is setup correctly, the service will start without any errors. If you do encounter errors when trying to start the service, then open a command window, go to c:\apache2\bin and run httpd.exe in the command window so that you can see what errors occur.
Step 17 – Access your repository via HTTP
Assuming that Apache started successfully, you should now be able to use your Subversion client (I use TortoiseSVN) to access your test repository via HTTP. Using TortoiseSVN, just right click on your workstation desktop, select TortoiseSVN > Repo Browser and enter: http:///svn/test1
Subversion should prompt you for your username and password and if you enter it correctly, you should now be browsing your empty repository.
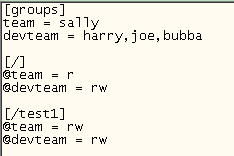
Step 18 – Create your svn-authz.conf file
You may now create your svn-authz.conf file to assign group or team permissions to your repository. David Winter has a good example here http://davidwinter.me.uk/articles/2006/03/03/access-control-for-subversion-with-apache2-and-authz showing the format of this file and explaining it more clearly.
Yours will reside in c:\apache2\conf and you’ll use Notepad to create it. Yours will look like this:
Step 19 - Uncomment the AuthzSVNAccessFile line in your param
Your entry in httpd.conf will now look like this:
<Location /svn/>

DAV svn

SVNParentPath c:/svnrepos

AuthType Basic

AuthName "Subversion Repository"

AuthUserFile conf/svn-password.pass

AuthzSVNAccessFile conf/svn-authz.conf

Require valid-user

</Location>
Step 20 – Restart the Apache service
If you’ve done everything correctly, your Apache service will restart without errors
Step 21 – Enable SSL
I’m not going to go into extensive detail on how to configure Apache’s SSL functions using mod_ssl because it is extensively documented elsewhere on the internet. Basically, you first need to uncomment:
LoadModule ssl_module modules/mod_ssl.so
in httpd.conf. After that, you’ll need to generate a CSR and key, and then either create a self-signed certificate or purchase a certificate from Verisign, www.instantssl.com, Godaddy or a similar vendor.
After you’ve generated your key & received your certificate, copy the appropriate files to your c:\apache2\conf\ssl folder.
Step 22 – Add new virtual host entry to your httpd.conf file
Paste the following code into your httpd.conf file, just above the entry that we created earlier.
<IfModule ssl_module>

SSLRandomSeed startup builtin

SSLRandomSeed connect builtin

</IfModule>

SSLMutex default

SSLSessionCache none

ErrorLog logs/sslerrors.log

LogLevel info

NameVirtualHost *:443

<VirtualHost yourhost.yourdomain.com:443>

  SSLEngine On

  SSLCertificateFile conf/ssl/host_yourdomain_com.crt

  SSLCertificateKeyFile conf/ssl/host.yourdomain.com.key

  SSLCertificateChainFile conf/ssl/host_yourdomain_com.ca

</VirtualHost>
Note that you’ll have to change the references to “host” and “yourdomain” to match the names you used. Also, you may or may not have an SSLCertificateChainFile entry, depending on your certificate vendor.
Step 23 – Update listen port in httpd.conf
Open your c:\apache2\conf\httpd.conf file and update your listen port from 80 to 443. Search for this line “Listen 80” in your file and just change the “80” to “443”.
Step 24 – Restart Apache Service
If everything is configured correctly, your Apache service should restart. It is common to encounter problems at this stage, so if Apache service does not start, I recommend starting httpd.exe from the command prompt so that you can see the errors it generates. Often the errors are related to “files not found” in relation to your certificate and key paths.
Step 25 – Install PHP to support WebSVN
I recommend downloading this package http://www.php.net/get/php-5.2.3-win32-installer.msi/from/a/mirror running the Windows installer.
During install, be sure to select Apache 2.2.x Module and allow the installer to update your httpd.conf file with the appropriate settings. Choose c:\php as your install path.
Step 26 – Download and unpack WebSVN 2.0
Download the most recent package from http://websvn.tigris.org/servlets/ProjectDocumentList (for this tutorial, I used 2.0 RC4). Unpack the files into c:\apache2\htdocs\websvn
Step 27 – Configure WebSVN
You will need to configure WebSVN to your environment by first renaming c:\apache2\htdocs\websvn\include\distconfig.inc to config.inc and then modifying the file appropriately following the directions in the file. Be sure to pay attention to these lines:
$config->setServerIsWindows();

$config->parentPath("c:\\svnrepos");
Step 28 – Add WebSVN entry to httpd.conf
Finally, add this new entry to your c:\apache2\conf\httpd.conf file, immediately below the closing tag of your SVN entry that we added earlier:
<Location /websvn/>

Options FollowSymLinks

order allow,deny

allow from all

AuthType Basic

AuthName "Subversion Repository"

Require valid-user

AuthUserFile conf/svn-password.pass

</Location>
Step 29 – Restart Apache and try it out
After you restart Apache, you should now be able to access https:///websvn/index.php
Additional steps I perform in a production setup and recommend that you consider:
Lock down your Apache configuration. There are numerous helpful references online to help you secure Apache. Two good articles to start with are:
http://www.securityfocus.com/infocus/1786
http://www.securityfocus.com/infocus/1818
WebSVN allows a number of customizations to enhance its usability and usefulness. I recommend that you read the notes in config.inc and enable the colorization, at a minimum.
Download
Many of the links above are now dead. If you'd like to download all of the packages I use in this guide, you can download a single ZIP file here.
Update 5/21/08: You can use CruiseControl.Net to setup an automated build process for your .Net projects; however, when doing so, there is an important step to perform when setting up CC.Net to checkout from an HTTPS SVN repository. Ale Riolo tells you here how to use a command prompt to permanently accept the SSL certificate.
Other Recent Blog Posts
Find this useful?
Want to receive our monthly tip to make your website easier to use and safer? No spam, just good advice. Signup!
Interests