CSS How To: Create a Print Friendly Style Sheet for Websites and Blogs
Some users like to print web pages, especially interest rate and disclosure pages on banking websites. Likewise, loan application confirmation pages on bank and credit union websites should be printable since customers often like to print copies for their records.
But if you or your visitors have ever tried to print a web page, you or they have probably experienced disappointment when the printed page contains all of the unnecessary navigation, graphics and other screen elements not relevant to the content on the page. This not only wastes paper & ink, but can also result in content flowing off the printed page entirely. Properly planning for and creating printable views of your pages can eliminate these problems.
The old school way to create printable pages was to create an entirely separate HTML page. But adds extra development costs, both up front and in long-term maintenance. Another method is to render output to PDFs, which again adds unnecessary development complexity and cost.
Using CSS is a better way that eliminates the costs and complexities of separate pages or PDF integration. You can make your site more user friendly by creating a separate print CSS that will make printing your pages a satisfying experience for your users. I'll show you how to do that in this blog post.
Let's get started.
First, let's look at an example that I randomly found by performing a Google search. Here is the page as rendered in the browser:

How the page looks in the browser
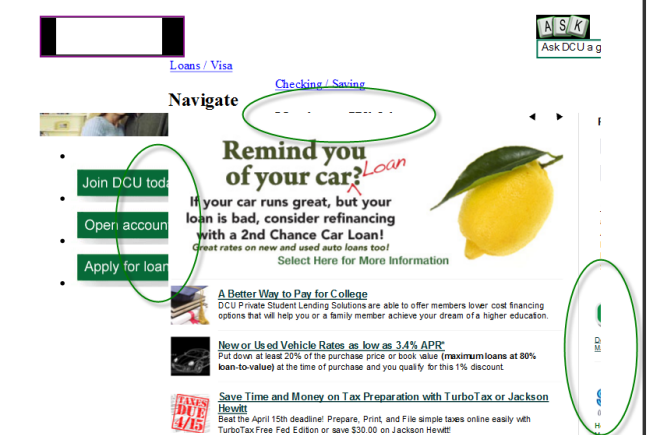
Now here is how the page looks when printed. I've circled the elements that get chopped off when printing the page.

Printed version of the page above.
Take a look at our Bank and Credit Union Secure Website Hosting page. If you go to the print preview you'll notice that the content takes up the full width of the page. We've removed the top header and navigation as well as the sidebar navigation and right sidebar. We chose to leave the partner logos and our copyright and contact information on the bottom of the page for reference.
This site was developed a few years ago, and if we would have then for this printer friendly style sheet, I would have designed it so we could keep our logo and phone number at the top of the page since this is important information for someone who might want to do business with us.
I chose this page because it is a real world example. I can't imagine that you will redesign/restructure your entire site just because I've taught you about printer style sheets, so I'm using this example to show you how to convert a page designed without printers in mind.
Let's really get started.
There are two popular ways to hide non-essential information in your print style sheet.
Method 1:
* {
display: none;
}
This method hides everything, then you would pick individual IDs or classes to show. This method is good because you can start with a blank slate and slowly add in the items you want to print. The downside to this method is you need to pick the proper display property for each item.
Method 2:
#navigation, #subnavigation, #sidebar, .donotprint {
display: none;
}
This method hides all of the IDs and classes that you do not want to show. This method is great because you don't have to do the extra work of unhiding items. The downside to this is that you have find each and every instance you want to hide and test all of your pages and possibly plan ahead by applying a donotprint class to some items.
I chose method 2 for our website:
#navigation, #subnav, #leftbar, #breadcrumbs, #phone, #photo, #rightbar, #logo {
display: none;
}
Once you've created your print style sheet, you'll need to set it up on your pages. Place this line in the head of your pages:
<link type="text/css" rel="stylesheet" href="styles/print-stylesheet.css" media="print" />
Make sure that you change "print-stylesheet.css" to what you've named your own print stylesheet.
Taking it further
Another tip for creating your print style sheet is to set all of your font-sizes in points. Printers use points, not pixels, to render fonts so you should set fonts in points to create the best looking printed text. Here is an example of a print style sheet set in points:
body {
/* set a base font size */
font-size: 12pt;
}
h1 {
font-size: 24pt;
}
h2 {
font-size: 18pt;
}
h3 {
font-size: 14pt;
}
p, ul, ol, dl {
/* paragraphs, unordered, ordered, and definition lists */
font-size: 12pt;
}
Other Recent Blog Posts
Find this useful?
Want to receive our monthly tip to make your website easier to use and safer? No spam, just good advice. Signup!
Interests